Blog

Ching Chou-Kuik Lil Bookworm Fairy | Lil Patch of Crafty Friends | Design Team Project

Ching-Chou-Kuik-Lil-Book-Worm


Good morning crafty friends! It’s time for a new challenge on the Lil Patch of Crafty Friends Challenge Blog. This month’s sponsor is Ching-Chou-Kuik with her stunning and whimsy images and as always, our challenge is Anything Goes.

I used the Lil Bookworm Fairy to create a scene card, which happens to be my favorite design. After printing my image onto Neenah Solar White 80lb. cardstock, I drew in the details with a pencil. Next, I created several masks and covered my images to ink blend the background.

Using Distress Ink in Blueprint Sketch, I inked up the bottom of my scene card and added Wilted Violet towards the top.

After removing the masks, I colored in the rest of the card using my Copic Markers.

Copic Color Combination

Skin:  E0000, E000, E00, E21, E11
Hair: E21, E23, E25, E25, E27, E29
Fairy Eyes: B01
Fairy Wings/Outfit: RV17, RV55, RV52
Trees: E79, E77, E74, E71
Leaves: YG17, YG03, YG01
Hill: YG17, YG05, YG00
Rocks: N7, N5, N3
Book pages: E44, E43, E41
Book Covers: V06, V01, BG15, BG10, V09, V04, BG49, BG45
Cat: N3, N1, N0
Flowers: RV17, RV55, YG05

Ching-Chou-Kuik-Lil-Book-Worm


Since my card was printed to an A2-sized card panel, I used a large stitched rectangle die to die cut the panel, then added my sentiment by white heat embossing it onto a piece of black cardstock.

I hope you’ll stop by the Lil Patch of Crafty Friends Challenge Blog to check out the other design team members and enter for your chance to win.

Visit our sponsor, Ching Chou-Kuik at the links below for more inspirations featuring all of the stunning images.

Shop: https://www.etsy.com/shop/gjzcck

Facebook: https://www.facebook.com/groups/chingchoukuikdigitalstamps/?ref=br_rs

They also run a Facebook challenge in their group

Blog: https://cck-digitalstamps-challenge.blogspot.com/

Instagram: https://www.instagram.com/chingchoukuik/


Thank you so much for stopping by, until next time….sprinkle a little creativity on your day!

This card is entered in the following challenges

Polkadoodles Craft Challenge | Digi Choosday Crafting Challenge | Cute Card Thursday Challenge | Through the Craft Room Door | Colour Crazy Craft Challenge | Word Art Wednesday Challenge | Crafty Catz Challenge 


Below you will find links to the supplies used to create this card. When possible, I use affiliate links to link products I use or personally believe in. To find out how affiliate links work and the companies I support, please check out my  Affiliate Disclosure/Shopping Sites. 


Newton’s Nook Designs Newton Dreams of Paris | Copic Coloring

Newton's Nook Designs Newton Dreams of Paris


Hey crafty friends! It has been a dream of mine to one day travel to Paris since I was in my early teens. I don’t know what happened, but I blinked and time flew by. I can still dream along with Newton’s Dreams of Paris stamp set by Newton’s Nook.

One of my favorite card designs is to create scenes and I thought this was a perfect stamp to create a French countryside scene with Newton and of course the Eiffel Tower. I began the card by stamping all of the images onto smooth white cardstock with Memento Tuxedo Black dye ink. Then I colored the images with Copic Markers using the color combinations listed below.

Copic Marker Combination

Black Cat: N7, N5, N3, N1, R32, R30
Red Shirt: R29, R27, R24, N1, N0
Beige Cat: E44, E31, E53, E51, R20, R30
Black Hat: N9, N7, N5, N3
Red Scarf: R29, R27, R24
Flowers/Hot Air Balloons: BG49, BG45, BG53, V17, V15, V12, RV17, RV55, RV52, Y18, Y15, Y00
Eiffel Tower: N7, N5, N3, N1


Newton's Nook Designs Newton Dreams of Paris


After coloring all of the images and using my ScanNCut to cut those out, I set them aside to work on the background. Using Distress Oxide ink in Tumbled Glass, I lightly inked up a piece of heavy-weight smooth cardstock. Next, I created the clouds using the Cloudy Sky Stencil and Salty Ocean Distress Oxide ink. I trimmed the background panel using a stitched rectangle die and set it aside to work on the grassy hills.

With Mowed Lawn and Lucky Clover Distress Oxide inks, I ink blended a couple of strips of cardstock and die-cut them using the Stitched Hillside Borders die by Lawn Fawn. And finally, I created a speech bubble for the sentiment by modifying the cloud stamp image.

At this point, I had all of the elements and began adhering the images to create a fun Parisian Countryside scene with two of the most adorable cats!


Newton's Nook Designs Newton Dreams of Paris


As always thank you so much for stopping by, until next time….sprinkle a little creativity on your day!

This card is entered in the following challenges 

Inky Paws Challenge 


Simon Says Stamp Wednesday Challenge | Crafty Animals | Sweet Stampers | We Love Chocolate Baroque |


Below you will find links to the supplies used to create this card. When possible, I use affiliate links to link products I use or personally believe in. This means that if you make a purchase through the links I share, I will earn a small commission at no additional cost to you! This helps me to run this blog and my YouTube channel to share the cards I make. Thank you so much for your support!


Newton’s Nook Designs is having a large Retirement Sale featuring this stamp at https://www.newtonsnookdesigns.com/retiring-products/


MFT Stamps Let’s Stick Together | Copic Coloring

MFT Stamps Let's Stick Together


Hey crafty friends! During the summer months, I like to re-build my stash of birthday cards for the upcoming year. Today, I’m sharing a fun birthday-inspired card featuring MFT Stamps’ Let’s Stick Together. These cacti are beyond adorable!

I stamped all of the images onto smooth white cardstock with Memento Tuxedo Black dye ink. All the images are colored with Copic Markers using the color combinations listed below.


MFT Stamps Let's Stick Together


Copic Marker Combination

Cacti: G28, YG67, YG17, YG13, YG01
Terracotta Pots: E18, E19, E08, E97, E95
Pink: RV17, RV55, RV52

I absolutely love bright and vibrant colors on my cards and this card called for a nice yellow background. Using Distress Oxide inks in Wild Honey, Mustard Seed, and Squeezed Lemonade, I inked up a piece of heavy-weight smooth cardstock. Then I created some texture by spritzing water on the panel and blotting it dry with a clean paper towel.

I thought the panel needs a little more so I splattered diluted white paint, yellow paint, and a little bit of orange paint for a festive look.


MFT Stamps Let's Stick Together


I was inspired by the MFT Sketch Challenge for the layout of this card and I followed their design sketch. For the rectangle element on my card, I simply added the scalloped rectangle frames and placed my images in the center. Finally, to finish this card, I stamped the sentiment and layered the front panel with foam adhesive to a brown cardstock mat.

As always thank you so much for stopping by, until next time….sprinkle a little creativity on your day!

This card is entered in the following challenges

MFT Stamps Wednesday Sketch Challenge 

Di’s Digi Challenge | Creatalicious Challenge | Crafty Creations Challenge | Creative Crafters Challenge |


Below you will find links to the supplies used to create this card. When possible, I use affiliate links to link products I use or personally believe in. This means that if you make a purchase through the links I share, I will earn a small commission at no additional cost to you! This helps me to run this blog and my YouTube channel to share the cards I make. Thank you so much for your support!


Julia Spiri Thumbelina | World Wide Open Challenge | Design Team Project

Julia Spiri Thumbilina


Hey crafty friends! Welcome to the World-Wide Open Design Challenge, today I’m sharing a special card I made for a wonderful friend of mine in celebration of Teacher’s Appreciation Week. Now typically, one would give a card of gratitude during this week, but a special person is a co-worker and I would not be the teacher I am without her.

I printed the image onto a 4.25 x 5.5 piece of smooth white cardstock and used my Copic Markers. I created the scene by grounding the images first, then adding the background elements.

Copic color combination

Ladybug: R39, R29, R27, R24, N7, N5, N3
Eyes: BG02, BG000, N1, N0
Leaves: G28, YG17, YG06, YG03, YG00,
Darker Leaves: G28, YG67, YG17
Thumbelina Skin: E04, E11, E21, E00
Hair: E31, E23, E25, E29
Dress: BG49, BG45, BG53, RV17
Flowers: V17, V15, V12, Y11
Large Flower: RV04, RV00, RV17, Y15, Y11, Y00
Grass on the ground: YG21, YG03, YG63
Grass blades: YG03, YG17, YG67, G99
Sky: B0000, B00, Blender


Julia Spiri Thumbilina


We would love for you to join us in the new World Wide Open Design Team Challenge, open to any DT member in the world. This challenge is always Anything Goes, runs through June 12, and is sponsored by the lovely Julia Spiri.

Stop by Julia’s Shop and check out her amazing work or join the Julia Spiri Facebook Group for more inspiration.

Thank you so much for stopping by, until next time….sprinkle a little creativity on your day!


Thank you so much for stopping by, until next time….sprinkle a little creativity on your day!

This card is entered in the following challenges

Polkadoodles Craft Challenge | Colour Crazy Craft Challenge | Word Art Wednesday | The Corrosive Challenge Blog | Crafty Gals Corner | Classic Design Challenge Blog | The Crafting Challenge | Jan’s Digi Challenge |


Julia Spiri Thumbelina


MFT Stamps Magical Dragons | Copic Coloring

MFT Magical Dragons


Hey crafty friends! I needed to make a card for a wonderful friend of mine and reached in my stash of older stamps for this one. Being a huge fan of mythological creatures and dragons, as cute as these, they are at the top of my list.

I am slowly working through my stash of stamps that I had to have and never used, you know the one most of us crafters seem to have. And this set was perfect for the occasion. I started by stamping out all of the images with black ink and coloring with Copic Markers.

Copic Marker Combination

Teal: BG49, BG57, BG45, BG53, B00
On the second blend, I added BG72 in the shadows and BG11 to the highlight areas to create a teal blend.
Pink: RV17, RV52, RV52
Princess: Skin E000, E00, E11, R20
Hair: E30, E33, E31, YR31
Dress: RV17, RV55, RV52
Crown: Y26, Y21, Y02
Clouds: BG0000, BG000, BG01


MFT Magical Dragons


For the background, I created an ink blended background and a grassy hill using an older die from MFT Stamps. The Snowy Hillside Die-namics is not available anymore but there are several other similar products on the market.

Finally, to complete this card, I added a brown mat to an A2-sized white card base. Next, I layered the background elements using foam adhesive and added a white heat embossed sentiment strip onto the same brown cardstock.


MFT Stamps Magical Dragons


For a little relaxation, I colored the other images in this stamp set to use for another time.

Yellow/Pink Dragon: Y17, Y15, Y13, Y00
On the second blend, I added Y38 to shadow areas
Dot Texture: YR04, YR18
Pink: RV55, RV02, RV00, RV000

Blue/Yellow Dragon: B06, B04, B02, B01, B00
YR15, Y02, Y00

Purple/Green Dragon: V17, V15, V12, V01
YG06, YG00


MFT Magical Dragons


Thanks so much for stopping by, until next time….sprinkle a little creativity on your day!

This card is entered in the following challenges

MFT Stamps Color Challenge 

Polkadoodles Digi Choosday | Creative Moments Challenge | Crafts Galore Encore Challenge | LeAnn’s World 101 | Get Creative Challenges |


Below you will find links to the supplies used to create this card. When possible, I use affiliate links to link products I use or personally believe in. This means that if you make a purchase through the links I share, I will earn a small commission at no additional cost to you! This helps me to run this blog and my YouTube channel to share the cards I make. Thank you so much for your support!


Fabrika Fantasy Beautiful Seahorse| Lil Patch of Crafty Friends | Design Team

Fabrika Fantasy Beautiful Seahorse


Hi crafty friends! Am I the only one that wonders how it could be May?? I guess time does fly and waits for no one. Today, a new challenge begins on the Lil Patch of Crafty Friends Challenge Blog and the design team is creating with stunning images by Fabrika Fantasy.

I created a thank-you card using the Beautiful Seahorse.  I printed the image onto a piece of Neenah Solar White 80lb cardstock and colored the image with Copic Markers.

Copic Color Combination

Gold: YR18, Y35, Y11, E44
Yellow: Y15, Y11, Y00, E43
Green: YG00, YG03, YG17, YG67
Pink: RV34, RV11. RV95, RV99
Purple: V17, V15, V12, BV08
Fish: Y28, Y26, Y15, Y06, Y02, Y00


Fabrika Fantasy Beautiful Seahorse

Since my card was printed to an A2-sized card panel, I used a large stitched rectangle die to die cut the panel, then added a mask to ink blend the background. To create a mask, I simply print the image a second time on regular paper, fussy cut the image out, and add liquid repositionable adhesive.

After ink blending the background using Salty Ocean Distress Oxide ink, I added white paint splatters to create some texture in my card. I created a sentiment strip by white heat embossing onto black cardstock then trimmed the sentiment into a small strip.

Head on over to the Lil Patch of Crafty Friends Challenge Blog to check out the other design team members and enter for your chance to win.

Also, be sure to visit our sponsor, Fabrika Fantasy, and see all of the amazing designs or visit their Facebook group for more inspiration.


Shop: https://www.fabrikafantasy.com/store.php#.X4sDYtBKjIV

Facebook: https://www.facebook.com/FabrikaFantasy

Instagram: https://www.instagram.com/fabrikafantasy/

Pinterest: https://www.pinterest.com.au/fabrikafantasy/


Thank you so much for stopping by, until next time….sprinkle a little creativity on your day!


This card is entered in the following challenges

Simon Says Stamps Wednesday Challenge | Polkadoodles Craft Challenge | Polkadoodle Digi Choosday | Crafty Catz | Through the Craftroom Door | Colour Crazy Craft Challenge | Pammie’s Inky Pinkies | Lemon Shortbread Challenge | A Gem of a Challenge | Di’s Digi Designs Challenge | Word Art Wednesday | Creatalicious Challenge | Creative Moments Challenge |

Lawn Fawn Scripty Bubbles Sentiment | Copic Coloring

Lawn Fawn Scripty Bubble Sentiments


Hey crafty friends! I’m sharing a fun birthday Rainbow-inspired card today featuring the adorable little mouse from Lawn Fawn’s Scripty Bubbles Sentiment stamp set.

My intention was to create a mouse holding a balloon for a fun Rainbow birthday card. I started by arranging the images in my Misti since I would be repeat stamping, then I stamped out the image several times. Next, using a Copic-friendly black marker, I drew a line connecting the images to create a string for the balloon.

Copic Marker Combination

Pink Mouse/Balloon: RV66, RV55, RV52, RV10, RV00 (On Balloon)
Green Mouse/Balloon: YG17, YG06, YG03, YG01, YG00
Blue Mouse/Balloon: BG07, BG05, BG02, BG01, BG000
Yellow Mouse/Balloon:  Y38, Y18, Y15, Y13, Y11
Orange Mouse/Balloon: YR09, YR07, YR04, YR02, YR01


For the background, I decided to create a rainbow watercolor smooshing look. Using a piece of acetate, I smooshed the ink onto white cardstock and added additional water droplets with a clean brush. I used Kitch Flamingo, Mowed Lawn, Mermaid Lagoon, Mustard Seed, and Carved Pumpkin to create the background. When I was happy with the background, I set the entire panel to completely dry.


Lawn Fawn Scripty Bubble Sentiments


I used the Scalloped Slimline with Hearts in Landscape die to die-cut a piece of black cardstock. I layered the die-cut on a piece of slate gray cardstock and stamped out the sentiment. To create a little interest to the background, I created a stencil by die-cutting cardstock with the Polka Heart Backdrop by Lawn Fawn and ink blending an bolder colors of Distress Oxide ink. Finally, I added the watercolor panel with foam adhesive to layered cardstock.

I have a speed coloring video on my Instagram for you to check out if you’re interested, where I share how I colored one of the images.  As always thank you so much for stopping by, until next time….sprinkle a little creativity on your day!

This card is entered in the following challenges

LawnFawnatics

Polkadoodles Craft Challenge | Crafty Catz | Colour Crazy Challenge | Di’s Digi Challenge | Creatalicious Challenge | Cut it Up Challenge | Penny’s Paper Challenge |


Below you will find links to the supplies used to create this card. When possible, I use affiliate links to link products I use or personally believe in. This means that if you make a purchase through the links I share, I will earn a small commission at no additional cost to you! This helps me to run this blog and my YouTube channel to share the cards I make. Thank you so much for your support!


Julia Spiri Two Worlds | World Wide Open Challenge | Design Team Project

Mermaid

Hey crafty friends! Welcome to another challenge on the World Wide Open Design Team Challenge. This month, I chose to work with this stunning image called Two Worlds by Julia Spiri, available here

I decided to create a 5″ x 7″ card and printed the image then colored it with my Copic Markers. Once colored, I trimmed the image down so that the final panel was 4.5″ x 7 “. 

Copic Color Combination 

Sky: RV95, RV93, RV91, YR20, YR00, YR000, Y11, Y00, Y000
Water: BG57, BG53, B00, B000, BG10
Mermaid Body/Top: V09, V06, V04, BV29
Mermaid Tail: V06, V04, RV02 
Skin: E13, E000
Hair: E29, E27, E25, E21
Jellyfish: RV02, RV00
Seastar: RV11, RV34
Fish: Y15
Underwater Bottom: E31, E33, E35 
Seagrass: YG67, G99
Shell: E43, E42, E40
Rocks: N5, N3, N1
Boat: N5, N3, N1
Sand: E35, E33, E31
Palm Tree: YG25
Shark Fin: N3, N1
Net: N1


Mermaid


I stamped out a sentiment with black ink and heat set it with clear embossing powder. then, I created a black mat for my card panel and added the front panel using foam sheets to pop up the entire panel. 

Stop by the World-Wide Open Design Team Challenge Blog to see what the other designers created using images by our lovely sponsor, Julia Spiri. You can visit her shop and see all of her amazing images available for purchase. 


Thank you so much for stopping by today and ……. sprinkle a little creativity on your day! 

This card is entered in the following challenges

Digi Choosday Challenge | Through the Craft Room Door | Gem of a Craft Challenge | Creative Moments Challenge |


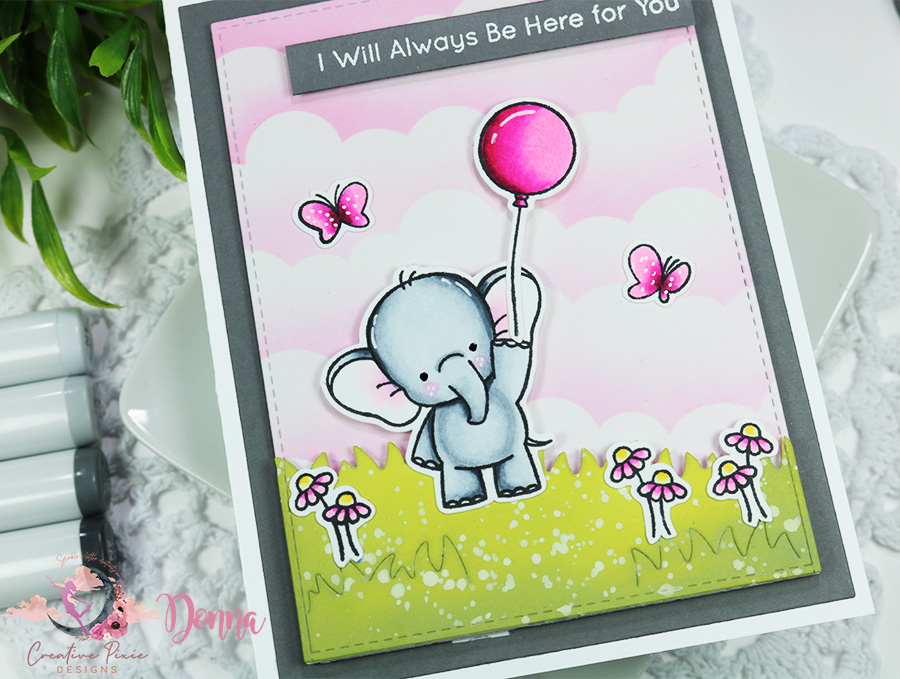
MFT Stamps Adorable Elephants | Copic Coloring

MFT Stamps Adorable Elephants

Hey crafty friends! I have made a personal goal to reach into my stash of older stamps and use them at least once. For today’s card, I picked out an oldie but a goodie to start my challenge.

I began by stamping out the images from MFT Stamps onto a piece of Neenah Solar White 80lb. cardstock using Memento Tuxedo ink. I used my Copic Markers to color in the images, and then I used my ScanNCut to cut the images out.


Copic Marker Combination

Elephant: C5, C3, C1, C0, C7 for deep shadows
Ears: RV52, RV00, 0
Balloon: RV69, RV09, RV06, RV04, RV02
Flowers: RV06, RV02, Y15, Y00
Butterflies: RV09, RV06, RV04, RV02


MFT Stamps Adorable Elephants


For the background, I created a simple cloud stenciled sky using the Mini Cloud Edge stencil and grass using the Tucked in Turf, Vertical die for this mini-scene. I used the stitched rectangle die from the A2 Stitched Rectangle STAX Set 2 Die-namics to die-cut all of the elements for my background.

Finally, to complete this card, I added a gray mat to an A2-sized white card base, then layered the background elements using foam adhesive, images, and finally added a white heat embossed sentiment strip.


MFT Stamps Adorable Elephants


I have a speed coloring video on my Instagram for you to check out if you’re interested. As always thank you so much for stopping by, until next time….sprinkle a little creativity on your day!

This card is entered in the following challenges

MFT Color Challenge | Lemon Shortbread Challenge | Word Art Wednesday | Creatalicious Challenge | Penny’s Paper Challenge | Digi Doodle Studios Challenge 

Below you will find links to the supplies used to create this card. When possible, I use affiliate links to link products I use or personally believe in. This means that if you make a purchase through the links I share, I will earn a small commission at no additional cost to you! This helps me to run this blog and my YouTube channel to share the cards I make. Thank you so much for your support!


The Paper Shelter Enchanting Butterflies | Lil Patch of Crafty Friends | Design Team Project


Happy Sunday crafty friends! Welcome to the new challenge on the Lil Patch of Crafty Friends Challenge Blog. We have a fabulous sponsor this month, I am using Enchanting Butterflies by The Paper Shelter for my design team project.

I love to create one-layer cards and this image was perfect to set in the center for exactly that. I printed the image onto a piece of Neenah Solar White 80lb cardstock and colored the main image with Copic Markers.

Copic Color Combination

Skin: 04, E13, E21, E00, E000, E0000, R20
Hair: RV06, RV04, RV02
Lips: RV66
Butterflies: Pink RV04, RV02, RV000, Teal BG05, BG01, BG000 Purple B66, B63 Yellow Y18, Y02
Shirt: C3, C1, C0, RV66
Flower: RV66, RV04
Background: YG11, YG20, Y000

I created the background by stamping out a scripty-background stamp onto a piece of Neenah Solar White Cardstock, then ink blended the background using Distress Oxide Ink in Kitch Flamingo. I just love this color by the way!

To complete this card, I stamped out the sentiment and heat embossed it before adhering the card panel to the pink background.  

Please visit our sponsor, The Paper Shelter, and check out all of the amazing images they have in their shop.

The Paper Shelter

The Paper Shelter Shop: http://www.thepapershelter.com/
Blog: https://thepapershelter.blogspot.com/
Facebook: https://www.facebook.com/groups/1159437137434536/
Instagram: https://www.instagram.com/thepapershelter/
Pinterest: https://www.pinterest.com.au/papershelter/our-digital-stamps-products/


Head on over to the Lil Patch of Crafty Friends Challenge Blog to check out what the other design team members created and enter for your chance to win.

As always, thank you so much for stopping by, until next time….sprinkle a little creativity on your day!

This card is entered in the following challenges

Simon Says Stamp Wednesday Challenge | Polkadoodles Craft Challenge | Digi Choosday Challenge | Crafty Catz Challenge | Colour Crazy Craft Challenge | Classic Design Challenge | Dare 2B Artzy |