Gerda Steiner Designs Lucky Duck | Copic Coloring

Gerda Steiner Designs Lucky Duck


Hey crafty friends, it’s a hot day here in Florida, and the forecast calls for the beach. But these little ducks will enjoy a nice pond to cool off.

For this card, I used Gerda Steiner’s Lucky Duck, and Stitched Pond die by Lawn Fawn. I began the card by stamping all the images onto smooth white cardstock with Memento Tuxedo Black dye ink. Next, I colored the images with Copic Markers using the color combinations listed below.

Copic Marker Combination

Ducks: Y17, Y15, Y13, Y11, YR09, YR04, YR02
Cattails: E57, E34, E31, G99
Lily pad: G99, G94, G40
Flower RV19, RV14, RV00


Gerda Steiner Designs Lucky Duck

After coloring all the images and using my ScanNCut to cut those out, I set them aside to work on the background. Using a stitched rectangle die, I trimmed a piece of cardstock to an A2-sized panel and inked the background with Distress Oxide ink in Antique Linen, Spun Sugar, and Worn Lipstick.

Next, I used a piece of teal cardstock and the Stitched Pond Die to die-cut the pond, then I inked the edges with Salvaged Patina Distress Oxide.  


Gerda Steiner Designs Lucky Duck


With all the elements ready, I began adhering everything with liquid adhesive and glue dots. I hope you like my card and as always, thanks so much for stopping by, until next time….sprinkle a little creativity on your day!

This card is entered in the following challenges

Polkadoodles Craft Challenge | Colour Crazy Challenge | Pammie’s Inky Pinkies | Gem of a Challenge | Alphabet Challenge Blog | Die Cut Diva’s Challenge Blog |

Below you will find links to the supplies used to create this card. When possible, I use affiliate links to link products I use or personally believe in. This means that if you make a purchase through the links I share, I will earn a small commission at no additional cost to you! This helps me to run this blog and share the cards I make. Thank you so much for your support!

SUPPLIES 

Gerda Steiner Designs Lucky Duck Stamp
Lawn Fawn – Lawn Cuts – Dies – Large Stitched Rectangle Stackables
from: Scrapbook.com
Lawn Fawn – Lawn Cuts – Large Stitched Rectangle

from: Scrapbookpal.com
Lawn Fawn – Lawn Cuts – Stitched Pond
from: Scrapbookpal.com
Ranger Ink – Tim Holtz – Distress Oxides Ink Pads – Antique Linen
from: Scrapbook.com
Ranger Ink – Tim Holtz – Distress Oxide Ink Pad – Antique Linen
from: Scrapbookpal.com
Ranger Ink – Tim Holtz – Distress Oxides Ink Pads – Spun Sugar
from: Scrapbook.com
Ranger Ink – Tim Holtz – Distress Oxide Ink Pad – Spun Sugar
from: Scrapbookpal.com
Ranger Ink – Tim Holtz – Distress Oxides Ink Pads – Worn Lipstick
from: Scrapbook.com
Ranger Ink – Tim Holtz – Distress Oxide Ink Pad – Worn Lipstick
from: Scrapbookpal.com
Ranger Ink – Tim Holtz – Distress Oxide Ink Pads – Salvaged Patina
from: Scrapbook.com
Ranger Ink – Tim Holtz – Distress Oxide Ink Pad – Salvaged Patina
from: Scrapbookpal.com
Copic Markers

from: Dick Blick 
Copic Markers 
from: Scrapbookpal.com 



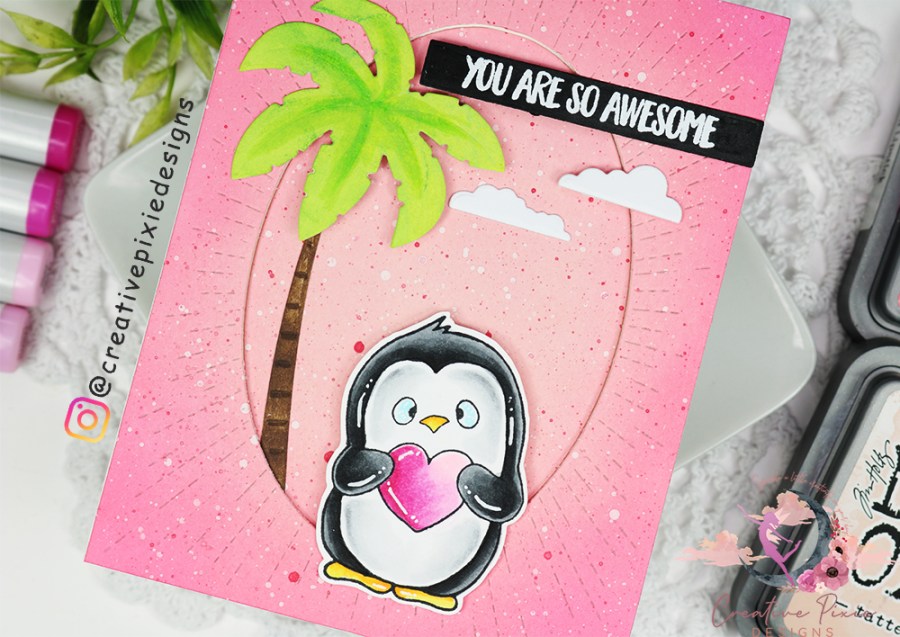
Gerda Steiner Designs Penguin with Heart | Colored with Copic Markers

Gerda Steiner Designs Penguin with Heart


Happy Sunday crafty friends! Cheers to kicking off the summer season. I am a preschool teacher by day, and my summer officially begins in less than two weeks. How excited am I??!!! I would say from all the excitement if I could do a backflip, I sure would!

I created a fun card featuring Gerda Steiner Designs’ Penguin Love stamp set with a fun summery background. Where else can you see penguins and palm trees? Only in Florida!

To begin this card, I stamped and colored the image with Copic Markers and used my ScanNCut to cut the image out.

Copic Color Combinations

Penguin: N9, N7, N5, N3, N1, N0
Heart: RV17, RV55, RV52, RV00

Gerda Steiner Designs Penguin with Heart


For the background, I started by ink blending Tattered Rose in the center and Worn Lipstick around the edges. Then I used a cover die to die cut the panel. I also added the palm tree that was die cut and colored with Copic Markers.

When my background was done, I added the sentiment, clouds, palm tree, and the image with foam adhesive or glue dots to finish off my card. I hope you like my card and as always, thank you so much for stopping by; until next time….sprinkle a little creativity on your day!

This card is entered in the following challenges

Gerda Steiner Designs 

LeAnn’s World 101 | Die Cut Diva’s

Gerda Steiner Happy Hoppy Bunny | Happy Easter | Copic Coloring

Gerda Steiner Happy Hoppy Bunny

Hey crafty friends! And Happy Easter to all those that celebrate. In my family, we celebrate Easter by attending church and enjoying family time in the afternoon. My children are a little past the Egg Hunt stage (which I’m thankful for) but not too old for an Easter Egg Scavenger Hunt!

My card today is not religious in nature but instead features the Easter Bunny. I began the card by stamping the images onto smooth cardstock and using my Copic Markers to color all images in the following color combinations.

Copic Marker Combination

Bunny: E57, E55, E53, E51, R20
Balloon: Y00, Y13, Y15, Y17
Flowers: YG17, YG01, Y19, RV00, RV17, RV52
Bee: Y19, Y15, BG01, BG000


Gerda Steiner Happy Hoppy Bunny


I used a panel of pink cardstock and heat embossed the polka dot background stamp by MFT Stamps. I wanted to add some dimension to the edges by inking with Picked Raspberry Distress Oxide ink.

Next, I created the central scene by die-cutting a piece of teal cardstock. I inked the panel with Salvaged Patina Distress Oxide ink and Peacock Feathers Distress Oxide ink at the outer edges. Then, I added the grassy hill die-cut from green cardstock and inked with Mowed Lawn Distress Oxide ink.


Gerda Steiner Happy Hoppy Bunny


After the background was complete, I stamped the sentiment and added the images using glue dots or liquid adhesive to finish my card.

I hope you like this little bright and cheery Easter card. As always, thank you so much for stopping by; until next time….sprinkle a little creativity on your day!

Gerda Steiner Designs 

Your Next Stamp Challenge 182 | The Corrosive Challenge | The Cutie Pie Challenge | Digi Doodle Studios Challenge |

Gerda Steiner Designs Hello Friend Tortoise | Colored with Copic Markers

Gerda Steiner Hello Friend Tortoise


Hey crafty friends! It’s almost the weekend, and I’m not as excited as I usually would be. For me, it means the end of Spring Break and a return back to school. Although I love being a preschool teacher, I am looking forward to these long breaks.

I enjoy making “just because” cards and love to have as many as I can in my stash for no particular reason other than sending a handmade card to my family and friends.

For this card, I used the Hello Friend Tortoise stamp set by Gerda Steiner Designs. I began the card by stamping the image onto smooth cardstock and using my Copic Markers to color all images in the following color combinations.

Copic Marker Combination

Green: YG67, G24, G21, G20
Dark Shell: E49, E47, E44
Light Shell: E44, E43, E41
Butterflies: Y117, Y15, Y11, W7, W5, W3


Gerda Steiner Hello Friend Tortoise


After coloring all of the images and using my ScanNCut to cut those out, I set them aside to work on the background. Using Distress Oxide ink in Dried Marigold, I inked up the bottom portion of a piece of heavy-weight smooth cardstock. Next, I added Kitsch Flamingo Distress Oxide ink and Picked Raspberry Distress Oxide ink just at the edges. I trimmed the background panel using a stitched rectangle die and set it aside to work on the grassy hills.

With Mowed Lawn Distress Oxide ink, I ink blended a panel then used the Stitched Hillside Borders die by Lawn Fawn. For texture, I splattered the panels with diluted white acrylic paint and allowed them to dry. I stamped the sentiment in the top left corner, adhered the images with liquid adhesive and glue dots, and added a frame to complete this card.


Gerda Steiner Hello Friend Tortoise


It was a quick and simple card to make and I hope you like it. As always thank you so much for stopping by, until next time….sprinkle a little creativity on your day!

I am playing along with the Gerda Steiner Designs Easter Egg Hunt

Simon Says Stamp Wednesday Challenge | Daisy Chain Challenge | Crafty Animals | Craft Rocket Challenges | Corrosive Challenge Blog | Digi Doodle Studios Challenge | Classic Design Challenge Blog | The Crafting Challenge |

Below you will find links to the supplies used to create this card. When possible, I use affiliate links to link products I use or personally believe in. This means that if you make a purchase through the links I share, I will earn a small commission at no additional cost to you! This helps me to run this blog and my YouTube channel to share the cards I make. Thank you so much for your support!


Gerda Steiner Designs Catch A Wave | Copic Coloring

Gerda Steiner Designs Catch a Wave


Hey crafty friends! It is officially summer, and this little duck is celebrating in a big wavy way. In my part of the world, summer is pretty hot and we do spend a lot of time in the water. Although we don’t spend as much time at the ocean as this little ducky, we do hit the pool on most days.

For this beach-themed card, I used the little ducky from Gerda Steiner Designs’ Catch a Wave. I stamped all of the images onto white smooth cardstock and colored the images with Copic Markers.

Copic Color Combinations

Ducky: Y08, Y04, Y00 on the second blend I added YR04
Beak / Feet: YR18, YR04
Pink: RV17, RV55, RV52
Purple: V06, V04, V000
Blue: B29, B24, B32
Teal: BG05, BG01, BG000
Glasses: N7, N5, N3
Beach: E21, E23, E25
Shells: E43, E42, E40


Gerda Steiner Designs Catch a Wave


I used several dies to create the beach scene. First, I ink blended a piece of Bristol smooth cardstock with Squeezed Lemonade, Mustard Seed, and Wild Honey Distress Oxide inks. Next, I created the splatters with acrylic paint. And finally, I die cut the panel using an Avery Elle Ellements die.

For the bottom of the scene, I ink blended the ocean waves with Blueprint Sketch, the sand with Antique Linen, and die cut both of the pieces with Kinetic Straight Waves Die Set by Whimsy Stamps.


Gerda Steiner Designs Catch a Wave


To finish my card, I added a white heat embossed sentiment and arranged my images and die-cut elements using foam adhesive or liquid adhesive.

This little ducky sure has the right idea to start off the summer! As always, thank you so much for stopping by, until next time….sprinkle a little creativity on your day!

This card is entered in the following challenges

Gerda Steiner Designs 

Polkadoodles Craft Challenge | Colour Crazy Challenge | A Gem of A Challenge | Di’s Digi Designs Challenge | Creative Fingers Challenge Blog | Word Art Wednesday | Creative Moments Challenge |

Below you will find links to the supplies used to create this card. When possible, I use affiliate links to link products I use or personally believe in. This means that if you make a purchase through the links I share, I will earn a small commission at no additional cost to you! This helps me to run this blog and my YouTube channel to share the cards I make. Thank you so much for your support!


Gerda Steiner Designs Foxes | Grads of Team Tiny Fall Video Hop | #gradsofteamtinyfall

Good morning everyone and welcome to my stop on the #gradsofteamtinyfall video hop. I created a fun fall-inspired scene card featuring Gerda Steiner Designs’ Foxes stamp.

Gerda Steiner Designs Foxes

To begin the card, I started by creating a stenciled cloudy sky background. I used the Heffy Doodle Cloudy Skies Stencil and ink blended the fluffy clouds using Salty Ocean Distress Oxide Ink. What I absolutely love about this stencil is that you can slide your cardstock into the cutout part of the stencil and ink blend.

Next, I worked on the grassy hill by ink blending Mustard Seed and Fossilized Amber Distress Oxide Ink then die cutting this panel using Lawn Fawn’s Grassy Border Die.

Gerda Steiner Designs Foxes

I stamped all of the images onto a piece of Neenah Solar White 80lb. cardstock, colored in using Copic Markers, and using the ScanNCut to cut the images out.

Copic Markers Combination

Foxes: E19, YR18, YR15, Y17, W7, W5, W3, E55, E53, E50
Wreath: R39, R27, R14, G09, YG05, YG01, Y06, Y00, E29, E27, E25, E23, E44, E43, E40
Toadstool: YR15, R29, R24, White Gel Pen

For the background, I trimmed the ink blended panel down to mat it to a piece of brown cardstock embossed with the Lawn Fawn Woodgrain Backdrop.

Gerda Steiner Designs Foxes

Finally, I added my images with fun foam adhesive and finished the card with a sentiment stamped and white heat embossed onto a piece of the same brown cardstock.

I have a video tutorial of this card where I share how I created this card and how I colored the images with Copic Markers. Watch the video below or follow the link to my YouTube Channel!

As always, thank you so much for stopping by, until next time….sprinkle a little creativity on your day!

This card entered in the following challenges 

Gerda Steiner Share your Designs 

Below you will find links to the supplies used to create this card. When possible, I use affiliate links to link products I use or personally believe in. This means that if you make a purchase through the links I share, I will earn a small commission at no additional cost to you! This helps me to run this blog and my YouTube channel to share the cards I make. Thank you so much for your support!


Gerda Steiner Designs Christmas Kitten | Christmas in July Video Hop

Good morning everyone, and welcome to the Christmas in July Video Hop. This is a fun hop meant to inspire you with Christmas cards or other handmade projects and get you motivated to make a Christmas project or two along the way.

For my sweet card today, I used the adorable kittens from the Gerda Steiner Designs Kitten Stamp set and several Lawn Fawn products to create a playful Christmas scene.

Gerda Steiner Designs Christmas Kitten

I decided to color these images with my Zig Clean Color Real Brush Markers, which I hardly ever reach for anymore.  I stamped the images onto a piece of Bristol Smooth cardstock with Versafine Onyx Black ink then heat set the images with clear embossing powder.

Zig Clean Color Real Brush Markers Combination

Gray Cat: 090 Gray, 091 Light Gray, 026 Light Pink, 036 Light Blue
Brown Cat: 072 Beige, 071 Flesh Color, 026 Light Pink, 036 Light Blue
Light Gray Cat: 091 Light Gray, 097 Pale Gray, 026 Light Pink, 036 Light Blue
Tree Branch: 040 Green, 041 Light Green
Hat: 260 Deep Red, 029 Geranium Red
Ornaments: 260 Deep Red, 029 Geranium Red, 052 Bright Yellow

Gerda Steiner Designs Christmas Kitten

For the background, I blended Distress ink in Tumbled Glass, Salty Ocean, Blueprint Sketch, and Chipped Sapphire then used the Lawn Fawn Snowfall Backdrop die to die cut the panel and create the snow effect.

To complete my scene, I die cut two panels from smooth white cardstock using Little Town Border die and Stitched Hillside Border die, then added Prisma Glitter to the top edge to mimic the sparkle of snow.

Gerda Steiner Designs Christmas Kitten


I attached my images with foam adhesive and finished my card with a sentiment that I white heat embossed on a piece of red cardstock.

I have a video tutorial of this card where I share how I created this card and how I colored the images with Zig Markers. Watch the video below or follow the link to my YouTube Channel!


Thank you so much for stopping by, until next time….sprinkle a little creativity on your day!

This card is entered in the following challenges

Gerda Steiner Designs Share Your Designs Challenge | The Cat Pajamas #370 Challenge | Dis Digi Challenge | Creative Fingers Challenge | 2 Crafty Critter Crazies | The Die Cut Diva’s Challenge Blog | Stamping Sensations | Daisy Chain Challenge | Crafty Animals | Digi Doodle Studios Challenge |

Below you will find links to the supplies used to create this card. When possible, I use affiliate links to link products I use or personally believe in. This means that if you make a purchase through the links I share, I will earn a small commission at no additional cost to you! This helps me to run this blog and my YouTube channel to share the cards I make. Thank you so much for your support!


Gerda Steiner Coffeesaurus | Instagram Giveaway | Coffee Lover’s Blog Hop

Good morning everyone, today begins the first of seven fun-filled days of the Spring/Summer Coffee Lover’s Blog Hop 2020. I
am starting my entry with the adorable Coffeesaurus by Gerda Steiner Designs.

Gerda-Steiner-Designs-Coffeesaurus

To begin this card, I stamped out the image using Memento Tuxedo Black ink onto a piece of Neenah Solar While 80 lb. cardstock.
I used my Copic Markers to color in the image and then I used my ScanNCut to cut it out.

Copic Color Combination

Dinosaur G28, YG67, YG17, YG13, YG11, YG01
Coffee E29, E25, E23, E21
Cup C5, C3, C1, R27

Gerda-Steiner-Designs-Coffeesaurus

For the background, I started by ink blending a piece of Bristol Smooth cardstock using Wilted Violet, Shaded Lilac, and Spun
Sugar Distress Oxide inks. I added water splatters, diluted white paint, and diluted black paint splatters.

Once dry, I die cut the panel slightly smaller than an A2 sized panel, created a black frame using a frame die, and added the
sentiment strip to complete this card.

Gerda-Steiner-Designs-Coffeesaurus

In the spirit of this blog hop, I am doing my own giveaway over on my Instagram. Click on the link below to be taken to my Instagram page for a chance to win a $10 gift certificate to Scrapbook.com.

As always, thank you so much for stopping by, until next time….sprinkle a little creativity on your day!

This card is entered in the following challenges

Coffee Lover’s Blog Hop  

Gerda Steiner Share Your Designs

Lemon Shortbread Challenge | Creative Fingers Challenge | Tuesday Throwdown | Word Art Wednesday |

Below you will find links to the supplies used to create this card. When possible, I use affiliate links to link products I use or personally believe in. This means that if you make a purchase through the links I share, I will earn a small commission at no additional cost to you! This helps me to run this blog and my YouTube channel to share the cards I make. Thank you so much for your support!


Rainbow Ink Blended Background | Gerda Steiner Hippo with Butterfly

Hi everyone, I hope you are staying safe and healthy. I have a card to share with you today inspired by a rainbow I saw recently.
I’m using Gerda Steiner’s adorable hippo on this “YOU ARE SO AWESOME” card.

Gerda Steiner Hippo with Butterfly

To begin, I Copic colored the stamped images from the Hippo with a Butterfly and used my ScanN Cut to cut him out.

Copic Markers Combination

Hippo: C9, C7, C5, C3, C1, C0
Shirt: C1, C0, Blender
Heart: 110 then I added Glossy Accents

For the background, I blended Distress inks in Mermaid Lagoon, Picked Raspberry, Spiced Marmalade, Mustard Seed, and
Mowed Lawn. I added water splatters to the panel and using a star stencil, I added Nuvo Glimmer Paste in Moonstone
for a little more texture to the front panel.

Gerda Steiner Hippo with Butterfly

While the background was drying, I stamped the sentiment from the Hippo and Butterfly stamp set onto a piece of black cardstock,
heat set it with white embossing powder, and die cut the sentiment with a sentiment strip die.

Gerda Steiner Hippo with Butterfly

To finish this card, I adhered the rainbow panel, Hippo image, and sentiment strip using double side adhesive foam to a
white A2 sized card base.

Thank you so much for stopping by, until next time….sprinkle a little creativity on your day!

This card is entered in the following challenges
Gerda Steiner Share Your Designs 

Polkadoodles Craft Challenge | Polkadoodles Digi Chooseday Craft Challenge | Simon Says Stamp Wednesday Challenge | Addicted to Stamps and More | Lemon Shortbread Challenge Blog | Crafty Creations Challenge | Lil Patch of Crafty Friends

Below you will find links to the supplies used to create this card. When possible, I use affiliate links to link products I use or personally believe in. This means that if you make a purchase through the links I share, I will earn a small commission at no additional cost to you! This helps me to run this blog and my YouTube channel to share the cards I make. Thank you so much for your support!


Gerda Steiner Designs’ Spring Bunny Friends ~ Copic colored ~ Just Because Card

Hello everyone,

I am again participating in the Gerda Steiner Progressive Monthly Challenge with this card featuring the Spring Bunny Friends digital stamp image.

Gerda Steiner Designs Spring Bunny Friends digital stamp colored with Copic Markers and Distress ink backgrounds handmade card.

I printed my digital image onto a piece of Neenah Solar White 80 lb. cardstock and colored my image using Copic markers.

Brown Bunny: E39, E37, E35, V93, V91, W9
Grey Bunny: W5, W3, W1, V93, V91
Flower: YG17, YG13, V09, V25, V22

After I finished coloring the image, I printed another copy onto regular copy paper and fussy cut the image out to make a mask.
I learned a little trick a while back of using copy paper as mask paper by adding a little bit of repositionable glue onto the printed image. I happen to use Aleene’s Tack-it Over & Over glue and letting it completely dry before I add it as a mask. I’ve never had a problem of it ripping or not being able to lift off of the original digital image.

Gerda Steiner Designs Spring Bunny Friends digital stamp colored with Copic Markers and Distress ink backgrounds handmade card.

I used Distress Oxide in Cracked Pistachio and an ink blending tool to add a little color to the background and filled some of the space with YNS Gumdrops enamel dots.
To put this card together, I die cut a purple panel from Lawn Fawn’s Perfectly Plaid 6×6 petite paper pad using the largest die from Lawn Fawn’s stitched rectangle stackable die set and adhered it to an A2 sized card base. I then die cut a green strip from the same paper pad and adhered it on top of the previous one.
Taking the focal point panel, I added it to the front with foam tape for a little dimension, stamped the sentiment onto a piece of green plaid scrap paper and added sparkle to the bunnies using the Spectrum Noir sparkle clear overlay pen to complete this card.

That’s all for me today, thanks for stopping by, until next time….sprinkle a little creativity on your day!

P.S. I edit all my projects using Pic Monkey, which allows me to crop my images, add effects, adjust exposures, sharpen colors, minor touch up and add my watermark. Click here for more information

PicMonkey Photo editing made of win

Below you will find links to the supplies used to create this card. Compensated affiliate links used at no additional cost to you. Thanks for your support!


HP Laser Jet 1020 Printer
Shop at:
Amazon
Neenah Solar White 80lb. cardstock
Shop at:
Amazon
Aleene's Tack-it Over and Over Liquid Glue
Aleene’s Tack-it Over and Over Liquid Glue
Shop at:
Amazon | Scrapbook.com | Blitsy
Distress Oxide Ink in Cracked Pistachio
Shop at:
Amazon | Scrapbook.com | Blitsy


Mini Ink Blending Tool
Shop at:
Amazon | Scrapbook.com | Blitsy
Mini Ink Blending Tool Replacement Pads
Shop at:
Amazon | Scrapbook.com | Blitsy
Mini Ink Blending Tool with Replacement Pads (Amazon)
Shop at:
Amazon
Lawn Fawn Perfectly Plaid Collection - Rainbow - 6x6 Petite Paper Pad
Lawn Fawn Perfectly Plaid Collection – Rainbow – 6×6 Petite Paper Pad
Shop at:
Amazon | Scrapbook.com | Hallmark Scrapbook and Crafts


Lawn Fawn Large Stitched Rectangle Stackable Die Set
Shop at:
Amazon | Scrapbook.com | Hallmark Scrapbook and Crafts
Spectrum Noir Sparkle Glitter Brush Pen Clear Overlay
Shop at:
Amazon | Hallmark Scrapbook and Crafts
Copic Sketch Markers E35 Chamois
Shop at:
Amazon | Blitsy
Copic Sketch Markers E37 Sepia
Shop at:
Amazon | Blitsy
Copic Sketch Markers E39 Leather Brown
Shop at:
Amazon | Blitsy
Copic Sketch Markers V91 Pale Grape
Shop at:
Amazon | Blitsy
Copic Sketch Markers V93 Early Grape
Shop at:
Amazon | Blitsy
Copic Sketch Markers Warm Gray NO.01
Shop at:
Amazon
Copic Sketch Marker W3 Warm Gray Grey
Shop at:
Amazon | Blitsy
Copic Sketch Marker W5 Warm Gray
Shop at:
Amazon
Copic Sketch Marker W9 Warm Gray
Shop at:
Amazon | Blitsy
Copic Sketch Marker YG13 Chartreuse
Shop at:
Amazon | Blitsy
Copic Sketch Marker YG17 Grass Green
Shop at:
Amazon | Blitsy
Copic Sketch Marker V09 Violet
Shop at:
Amazon | Blitsy
Copic Sketch Marker V22 Ash Lavender
Shop at:
Amazon | Blitsy
Copic Sketch Marker V25 Pale Blackberry Purple
Shop at:
Amazon | Blitsy