MFT Stamps Magical Dragons | Copic Coloring

MFT Magical Dragons


Hey crafty friends! I needed to make a card for a wonderful friend of mine and reached in my stash of older stamps for this one. Being a huge fan of mythological creatures and dragons, as cute as these, they are at the top of my list.

I am slowly working through my stash of stamps that I had to have and never used, you know the one most of us crafters seem to have. And this set was perfect for the occasion. I started by stamping out all of the images with black ink and coloring with Copic Markers.

Copic Marker Combination

Teal: BG49, BG57, BG45, BG53, B00
On the second blend, I added BG72 in the shadows and BG11 to the highlight areas to create a teal blend.
Pink: RV17, RV52, RV52
Princess: Skin E000, E00, E11, R20
Hair: E30, E33, E31, YR31
Dress: RV17, RV55, RV52
Crown: Y26, Y21, Y02
Clouds: BG0000, BG000, BG01


MFT Magical Dragons


For the background, I created an ink blended background and a grassy hill using an older die from MFT Stamps. The Snowy Hillside Die-namics is not available anymore but there are several other similar products on the market.

Finally, to complete this card, I added a brown mat to an A2-sized white card base. Next, I layered the background elements using foam adhesive and added a white heat embossed sentiment strip onto the same brown cardstock.


MFT Stamps Magical Dragons


For a little relaxation, I colored the other images in this stamp set to use for another time.

Yellow/Pink Dragon: Y17, Y15, Y13, Y00
On the second blend, I added Y38 to shadow areas
Dot Texture: YR04, YR18
Pink: RV55, RV02, RV00, RV000

Blue/Yellow Dragon: B06, B04, B02, B01, B00
YR15, Y02, Y00

Purple/Green Dragon: V17, V15, V12, V01
YG06, YG00


MFT Magical Dragons


Thanks so much for stopping by, until next time….sprinkle a little creativity on your day!

This card is entered in the following challenges

MFT Stamps Color Challenge 

Polkadoodles Digi Choosday | Creative Moments Challenge | Crafts Galore Encore Challenge | LeAnn’s World 101 | Get Creative Challenges |


Below you will find links to the supplies used to create this card. When possible, I use affiliate links to link products I use or personally believe in. This means that if you make a purchase through the links I share, I will earn a small commission at no additional cost to you! This helps me to run this blog and my YouTube channel to share the cards I make. Thank you so much for your support!


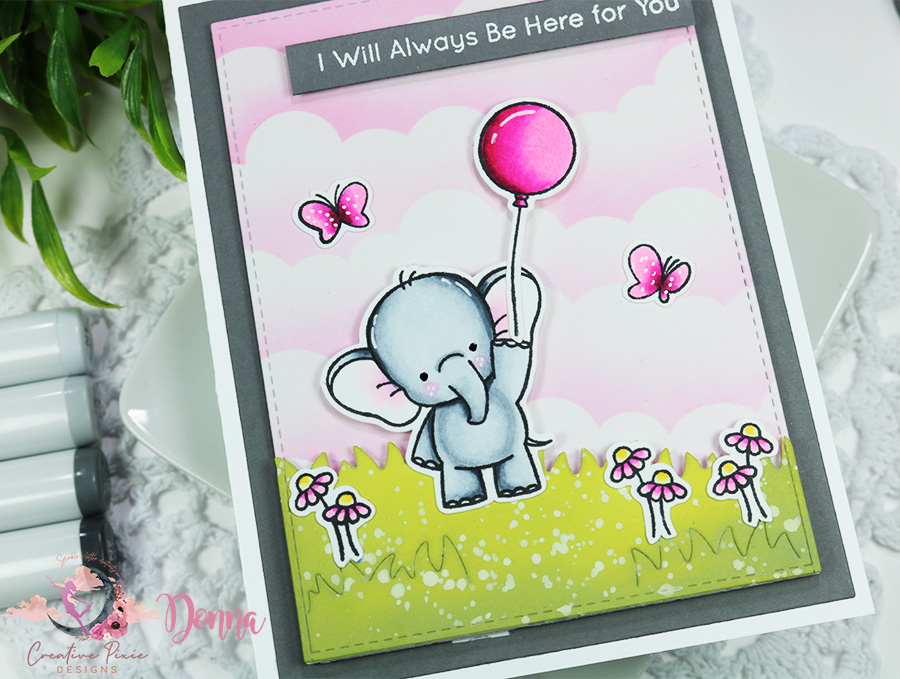
MFT Stamps Adorable Elephants | Copic Coloring

MFT Stamps Adorable Elephants

Hey crafty friends! I have made a personal goal to reach into my stash of older stamps and use them at least once. For today’s card, I picked out an oldie but a goodie to start my challenge.

I began by stamping out the images from MFT Stamps onto a piece of Neenah Solar White 80lb. cardstock using Memento Tuxedo ink. I used my Copic Markers to color in the images, and then I used my ScanNCut to cut the images out.


Copic Marker Combination

Elephant: C5, C3, C1, C0, C7 for deep shadows
Ears: RV52, RV00, 0
Balloon: RV69, RV09, RV06, RV04, RV02
Flowers: RV06, RV02, Y15, Y00
Butterflies: RV09, RV06, RV04, RV02


MFT Stamps Adorable Elephants


For the background, I created a simple cloud stenciled sky using the Mini Cloud Edge stencil and grass using the Tucked in Turf, Vertical die for this mini-scene. I used the stitched rectangle die from the A2 Stitched Rectangle STAX Set 2 Die-namics to die-cut all of the elements for my background.

Finally, to complete this card, I added a gray mat to an A2-sized white card base, then layered the background elements using foam adhesive, images, and finally added a white heat embossed sentiment strip.


MFT Stamps Adorable Elephants


I have a speed coloring video on my Instagram for you to check out if you’re interested. As always thank you so much for stopping by, until next time….sprinkle a little creativity on your day!

This card is entered in the following challenges

MFT Color Challenge | Lemon Shortbread Challenge | Word Art Wednesday | Creatalicious Challenge | Penny’s Paper Challenge | Digi Doodle Studios Challenge 

Below you will find links to the supplies used to create this card. When possible, I use affiliate links to link products I use or personally believe in. This means that if you make a purchase through the links I share, I will earn a small commission at no additional cost to you! This helps me to run this blog and my YouTube channel to share the cards I make. Thank you so much for your support!


Spotlight Ink-Blended Die-cutting | Two-For-One Cards | MFT Mermazing

Hi crafty friends! Today I’m sharing a fun project featuring spotlight ink blended die-cutting that results in two cards for one! I
created the two cards using MFT Mermaid Tail Background and Mermazing Stamp sets.

MFT Mermazing

To begin, I stamped the background stamp onto a piece of Bristol smooth cardstock using Versamark ink and heat embossed
one background with white embossing powder and black embossing powder on the other panel. I reached for my Misti to help
me stamp the background in the same spot on both of my panels.

MFT-Mermazing

MFT Background

Next, I ink blended the white embossed background using Wilted Violet, Shaded Lilac, Broken China, and Cracked Pistachio
Distress Ink and left the black embossed panel plain.

MFT Background

In order to achieve the spotlight of the stamped background, I arranged both of the panels one on top of the other and die cut a
heart out of the center of both panels. While the second panel did not cut all the way through, by placing it under the panel
previously, the die left an indentation to place the die and cut it through.

Copic Markers Combination

Mermaid Tail: V09, V06, V04, V01, V000
Hair: YR15, YR18, R29, R59, E47
Dark Turtle: E30, E23, E25, E29, G28, YG17, YG13, YG01
Mermaid tail: BG49, BG45, BG53
Hair: E50, E53, E55, E57
Light Turtle: E40, E42, E43, E40, G28, YG17, YG13, YG00
Skin: E000, E00, E21, E11, E04, R30, R20

MFT-Mermazing

After coloring and die cutting the images, I added the background panels to a white card base and added the opposite heart die
cut with dimension to highlight the spotlight die-cut. I was able to create two cards at once by using one
background stamp and one die-cut.

I love how the ink blended background perfectly lines up with the black embossed one. I added the stamped sentiment stirps
and added the images to the heart die-cuts and I have two very stunning cards with the effort of one.

Thank you so much for stopping by, until next time….sprinkle a little creativity on your day!


MFT Sweet Sloths Hanging out with My Favorite Person Card

Happy weekend crafty friends! I wanted to share a sweet little sloth card featuring the MFT Sweet Sloths images
for the current sketch challenge on the MFT blog.

stamped image of sloth

Unfortunately, this set is retired, but with MFT’s Vault releases opening up, you never know, this set might come back.

I began by stamping one of the sloth images onto a piece of Neenah Solar White cardstock with Memento Tuxedo Black
dye ink and colored it in with Copic Markers.

Copic Markers Combination

Sloth Body: E29, E39, E35, E33, E31
Sloth Face: E55, E53, E51, E50
Branch: E44, E43, E41
Flowers: Y08, C3, C00, BV01
Leaves: YG17, YG06, YG01
Butterflies: BV08, BV13, BV01
Y17, Y08, Y02, Y00
R89, R85, R81

For the background, I blended Distress Oxide ink in Mermaid Lagoon onto a piece of Bristol Smooth cardstock focusing on
the upper half of the panel. I splattered the panel with water and blotted it dry with a paper towel.

stamped image of sloth

Using a stitched scallop edge frames die, I die cut several pieces of white cardstock so that I can stack them
for a bit of dimension. At this point, I began adhering all of the components to a white card base using
foam tape and liquid adhesive.

stamped image of sloth

Don’t forget to stop by the MFT Sketch Challenge Blog and enter for a chance to win some MFT goodies.

Thank you so much for stopping by, until next time….sprinkle a little creativity on your day!

This card is entered in the following challenges

A Gem of a ChallengeSimon Says Stamp Wednesday Challenge | Lemon Shortbread Challenge Blog | Creative Fingers Challenge | Crafty Friends Challenge | Tuesday Throw-downs | Word Art Wednesday | Creative Moments Challenge | Time Out Challenges | Cuttie Pie Challange |

Below you will find links to the supplies used to create this card. Compensated affiliate links used at no additional cost to you.
Thanks for your support!


MFT Stamps Captivating Mandala | Easy Water-colored Background | Christmas Handmade Card

Hi everyone! It seems that my Christmas cardmaking season is off to a slow start so I thought I’d make a quick and simple
Christmas card to add to my stash.

A clean and simple Merry Christmas handmade card featuring MFT Captivating Mandala die set against an ink water colored background.

For this card, I wanted to create a bright background that would perfectly compliment the Captivating Mandala die
by My Favorite Things. I began this card by painting a bright blue background using Mermaid Lagoon Distress Oxide
ink and Tim Holtz’s watercolor cardstock. I did a little ink smooshing with Blueprint Sketch Distress Oxide ink
and let the panel air dry.

A clean and simple Merry Christmas handmade card featuring MFT Captivating Mandala die set against an ink water colored background.

While the background was drying, I die cut the Captivating Mandala four separate times out of white heavyweight cardstock
and stacked them together for thickness. As a final step, my helper (aka my very eager daughter) sprayed the snowflake with
Glitter Dust in Silver for a little sparkle.
After all of the components were dry, I stamped the sentiment and heat set it with red embossing powder and added the
snowflake to the front with a red piece of thread to tie in the sentiment.

A clean and simple Merry Christmas handmade card featuring MFT Captivating Mandala die set against an ink water colored background.

This card was inspired by the current MFT Sketch Challenge # 463 on their blog. Check out the
design teams inspiration projects for this challenge.

Thank you so much for stopping by, until next time….sprinkle a little creativity on your day!

Below you will find links to the supplies used to create this card. Compensated affiliate links used at no additional cost to you.
Thanks for your support!


MFT Birthday Bears ~ Zig Clean Color Real Brush Marker ~ Birthday card

Hey everyone,

I’m again participating in the MFT Sketch Challenge # 368 and MFT Color Challenge # 85 over on their blog, follow the links for more information. My card features the adorable bear from the Birthday Bears stamp set on this cute birthday card.

My Favorite Things Birthday Bears stamp set colored with Zig Clean Color Real Brush Markers and patterned paper handmade birthday card.

I first stamped all of the images using VersaFine Onyx Black ink onto a piece of Bristol smooth cardstock and colored all of the images using my Zig Clean Color Real Brush Markers.

The color combinations I used:

Bear: 062 Dark brown and 065 Mid brown
Banner: 070 Orange, 032 Persian blue and 022 Carmine red
Balloons: 070 Orange, 032 Persian blue and 022 Carmine red
Present: 070 Orange and 022 Carmine red

My Favorite Things Birthday Bears stamp set colored with Zig Clean Color Real Brush Markers and patterned paper handmade birthday card.

To put this card together, I followed the sketch provided by the challenge. I used a piece of banana colored cardstock for the base of the card and a polka dot piece of patterned paper from My Favorite Things Fun & Frolic paper pad.
I added all of my images either flat on the panel or with some foam adhesive for dimension. And that will complete this birthday card!

Thanks for stopping by, until next time….sprinkle a little creativity on your day!

P.S. I edit all my projects using Pic Monkey, which allows me to crop my images, add effects, adjust exposures, sharpen colors, minor touch up and add my watermark. Click here for more information

PicMonkey Photo editing made of win

Supplies used
Compensated affiliate links used at no additional cost to you. Thanks for your support!

My Favorite Things Birthday Bears stamp set
MFT Peek-a-boo Circle Windows die-namics
MFT Fun & Frolic 6 x 6 Paper Pack

My Favorite Things Birthday Bears Die-namics
Shop at:
Amazon
Strathmore Watercolor Paper pad
Shop at:
Amazon | Scrapbook.com | Blitsy
Versafine Onyx Black ink
Shop at:
Amazon | Blitsy
Zig Clean Color Real Brush Markers
Shop at:
Amazon | Scrapbook.com | Blitsy

My Favorite Things Polar Bear Pals ~ Copic Colored ~ Distress Oxides Background ~ Christmas Card

Hey everyone,

This weeks’ card is inspired by MFT’s Color Challenge # 82, and the card I made using MFT’s Polar Bear Pals. Personally, I love polar bears and I think they are one of the most majestic wild animals on this earth.

My Favorite Things Polar Bear Pals stamp set colored with Copic Markers and Distress Oxides ink backgrounds handmade Christmas card.

I started by ink blending a piece of watercolor paper using Distress Oxides Ink in Salty Ocean to create the background and die cut the panel using MFT’s Stitched Rectangle Stax’s.
The various polar bear images were stamped onto a piece of Neenah Solar White 80 lb. cardstock using Memento Tuxedo Black ink and colored with Copic markers. I am still learning to pair my combinations and blending but I think these images did not turn out too bad.

My Favorite Things Polar Bear Pals stamp set colored with Copic Markers and Distress Oxides ink backgrounds handmade Christmas card.


Working on the snow banks, I used a piece of white glittered cardstock and die cut the banks using MFT’s Stitched Basic Edges 2. I adhered those pieces to the card base and added my images with some foam tape for dimension.

My Favorite Things Polar Bear Pals stamp set colored with Copic Markers and Distress Oxides ink backgrounds handmade Christmas card.

All there was left to do to complete this card was stamp the sentiment and add some falling snow using 3D Puffy paint. In hindsight, I would have chosen a different sentiment and maybe even heat embossed it with white embossing powder. And my falling white snow has now taken on a bluish tint from the background. And lastly, I will be very happy to finish using up the glitter paper, as it flakes terribly. Although I am happy with the design of my card, some components not so much and will note to self for future!

The inspiration for this card is MFT’s Color Challenge # 82

That’s it for me for now, as always, thanks for stopping by, until next time….sprinkle a little creativity on your day!


P.S. I edit all my projects using Pic Monkey, which allows me to crop my images, add effects, adjust exposures, sharpen colors, minor touch up and add my watermark. Click here for more information

PicMonkey Photo editing made of win


MFT Pure Innocence Happy Banner~Copic Colored~Birthday Card~Color Challenge 78

Hey everyone,

Today’s card is inspired by the My Favorite Things’ Color Challenge 78, and I made this one for a very special upcoming birthday.

My Favorite Things Pure Innocence Happy Banner colored with Copic Markers in combination with patterned paper handmade birthday card.

I started by stamping my image onto a piece of Spectrum Noir Ultra smooth cardstock and colored it using Copic Markers.

Dress/Socks: Y11, Y13, and Y17
Banner/Bow: R22, R24 and R27
Shoes: B34 and B39
Hair: Y21, E33 and E47
Skin: E000, E30, E11 and R20

Working on the card base, I cut a polka dot piece of patterned paper down to 4”x 5.25” and rounded the corners with a punch. I adhered the polka dot panel to a cream colored A2 sized card base.

My Favorite Things Pure Innocence Happy Banner colored with Copic Markers in combination with patterned paper handmade birthday card.

Taking the same cream colored cardstock, I die cut a circle and a frame from blue cardstock attaching them together and adding a piece of fun foam for dimension.

To complete this card, I stamped the sentiment from the stamp set using Versamark clear ink and heat embossed it using blue embossing powder.

And that completes the card which I am also entering into the My Favorite Things Sketch Challenge Sketch 353.

As always thanks for stopping by, until next time….sprinkle a little creativity on your day!


P.S. I edit all my projects using Pic Monkey, which allows me to crop my images, add effects, adjust exposures, sharpen colors, minor touch up and add my watermark. Click here for more information

PicMonkey Photo editing made of win

Supplies used
Compensated affiliate links used at no additional cost to you. Thanks for your support!

3M Foam tape
3M Foam tape
Shop at:
Amazon
Memento Tuxedo Black Dye Ink
Shop at:
Amazon | Scrapbook.com
My Favorite Things Pure Innocence Happy Banner Die Set
Shop at:
Amazon
Hero Arts Circle Infinity Dies
Shop at:
Amazon | Scrapbook.com
Hero Arts Rectangle Infinity Dies
Shop at:
Amazon | Scrapbook.com
Spectrum Noir Ultra Smooth Premium Cardstock
Shop at:
Amazon

MFT Sweet Sloth ~ Birthday card ~ Copic Colored ~ MFT Sketch Challenge

Hey everyone,

I used this cute little sloth to create a card for my entry in MFT Wednesday Sketch Challenge-Sketch 346 for this week.

MFT Sweet Sloth birthday card colored with Copic markers and patterned paper handmade card.

I started by stamping all of my images from MFT’s Sweet Sloths stamp set onto a piece of Spectrum Noir paper using Memento Tuxedo Black dye ink. I used both of the clouds, one of the flower images and of course the sweet little sloth.
Using my Copic markers, I colored all of the images using the following combinations:
Sloth and tree: E42, E43, E44 and E47
In the tree branch, I added more of the E47 for a darker look
Leaves: YG11, YG13 and YG17
Small flowers: C1 and Y19
Large flower: Y19, RV11, RV14 and RV17
Cloud: BG0000 and B00

MFT Sweet Sloth birthday card colored with Copic markers and patterned paper handmade card.

Next, I did a little ink smooshing using Distress Ink in Twisted Citron onto a piece of Bristol Smooth cardstock and die cut it using a stitched circle die.

Working on the large panel, I used a piece of patterned paper from American Crafts Everyday paper pad collection and a Stitched Rounded Rectangle Dies from Pink and Main, which I wrapped a piece of black and white twine and adhered it to a top folding A2 size card base.

MFT Sweet Sloth birthday card colored with Copic markers and patterned paper handmade card.

To complete this card, I layered the circle on top of the panel and arranged all my images using foam squares for some added dimension. I used a sentiment from the stamp set, which I heat embossed onto a piece of black cardstock and white embossing powder. Adding a few pieces of sequence and some shimmer from Wink of Stella glitter pen for a little sparkle finished the card. As always, thanks for stopping by, until next time….sprinkle a little creativity on your day!

P.S. I edit all my projects using Pic Monkey, which allows me to crop my images, add effects, adjust exposures, sharpen colors, minor touch up and add my watermark. Click here for more information

PicMonkey Photo editing made of win

Supplies used
Compensated affiliate links used at no additional cost to you. Thanks for your support!

Scrapbook.com

Tsukineko - Memento - Fade Resistant Dye Ink Pad - Tuxedo Black Ranger Ink - Tim Holtz - Distress Ink Pads - Mini - Twisted Citron Strathmore - 9 x 12 Bristol Smooth Paper Pad - 20 Sheets Doodlebug Design - Doodle Twine - Beetle Black Hero Arts - Embossing Powder - White Puff ZIG - Memory System - Wink Of Stella - Glitter Brush Marker - Glitter Clear

Amazon.com

MFT Pure Innocence Tutu Cute~ Sketch Challenge 345~ Copic colored card

Hey everyone,

I’m back this week with an overdue post and an absolutely overdue time to myself to craft. It’s been a busy couple of weeks getting the kids back to school but they are finally starting with their regular schedule and I can get back to my craft time.

This week I wanted to start off with a card I made to participate in the MFT Sketch Challenge 345. For me, this particular sketch just begged to be made as a shaker card and I did just that (even though I’m still a bit intimidated by creating shaker cards).

MFT Pure Innocence Tutu Cute stamp colored with Copic markers and patterned paper handmade card.

To start, I stamped the My Favorite Things Pure Innocence Tutu Cute image onto a piece of Spectrum Noir cardstock with Memento Tuxedo Black dye ink, since it is a Copic friendly ink.

Copic colors I used to color my image:

Skin: E50, E51, and E53
Hair: E23, E25 and E29
Tutu and shoes: RV32 and RV34
Belt: C1, C3 and C5

I then added some shimmer to her dress and shoes and thought I would be fancy and use my Spectrum Noir Sparkle Markers in Pink Champagne, which changed the color of my image. That was not the intended action but it was fine. There is no starting over!

Next, I worked on the shaker window by first taking a piece of Bristol Smooth cardstock and ink blending with Distress Oxide Ink in Worn Lipstick. I added a few sprays of Sheer Shimmer Spritz to activate and dabbed it with a paper towel.

MFT Pure Innocence Tutu Cute stamp colored with Copic markers and patterned paper handmade card.

Working on the top panel, I took a piece of white cardstock cut down to 4.25” x 5.5” and stamped My Favorite Things’ Star Celebration background with Altenew Rose Quartz dye ink. I cut a strip of American Crafts’ Dots & Stripes paper and adhered it to the star panel.

Taking a circle die, I cut the center out where the shaker would fit, creating the nested look for the shaker. However, this was an afterthought and there was some minor surgery to get the shaker to fit.

MFT Pure Innocence Tutu Cute stamp colored with Copic markers and patterned paper handmade card.

To put this card together, I created a background for the shaker with a cloud stencil and Distress Oxide Ink in Worn Lipstick. I know that it’s not a realistic cloud scene but blue just did not fit here. So we have pink clouds and that’s ok. I adhered the rest of the pieces onto the panel, added a sentiment and finished off the card with a few pieces of Simon Says Stamp Moonshine Confetti Mix.

I hope you enjoy this softer looking card as I don’t tend to make too many of these and as always thanks for stopping by, until next time….sprinkle a little creativity on your day!

P.S. I edit all my projects using Pic Monkey, which allows me to crop my images, add effects, adjust exposures, sharpen colors, minor touch up and add my watermark. Click here for more information

PicMonkey Photo editing made of win

Supplies used
Compensated affiliate links used at no additional cost to you. Thanks for your support!

Scrapbook.com

My Favorite Things - Pure Innocence - Clear Acrylic Stamps - Tutu Cute Strathmore - 9 x 12 Bristol Smooth Paper Pad - 20 Sheets Ranger Ink - Tim Holtz - Distress Oxides Ink Pads - Worn Lipstick Hero Arts Nesting Circle Infinity Dies Lawn Fawn Lawn Cuts Stitched Circle Frames Dies

Amazon.com