Whimsy Stamps Tweetie Pie | Shimmerz Paints | Instagram Hop + Giveaway

Tweetie Birds

Hey crafty friends! I’m super excited to be participating in Shimmerz Paints and Whimsy Stamps Instagram Hop filled with awesome inspiration and prizes. To enter the giveaway, you must follow the link to IG and complete the steps for entry.

Shimmerz Paints carries several product lines from sprays, paints, and texture pastes. For my card, I began by trimming a piece of watercolor cardstock with the Whimsy Stamps Slimline Cardbuilder Die. Next, I spritzed the Coloringz sprays in Heidi Ho Blue, Vivacious Violet, and In Deep. Once the panel dried, I added more of the Heidi Ho Blue Coloringz by taking a paintbrush and brushing the pigmented paint across the panel.

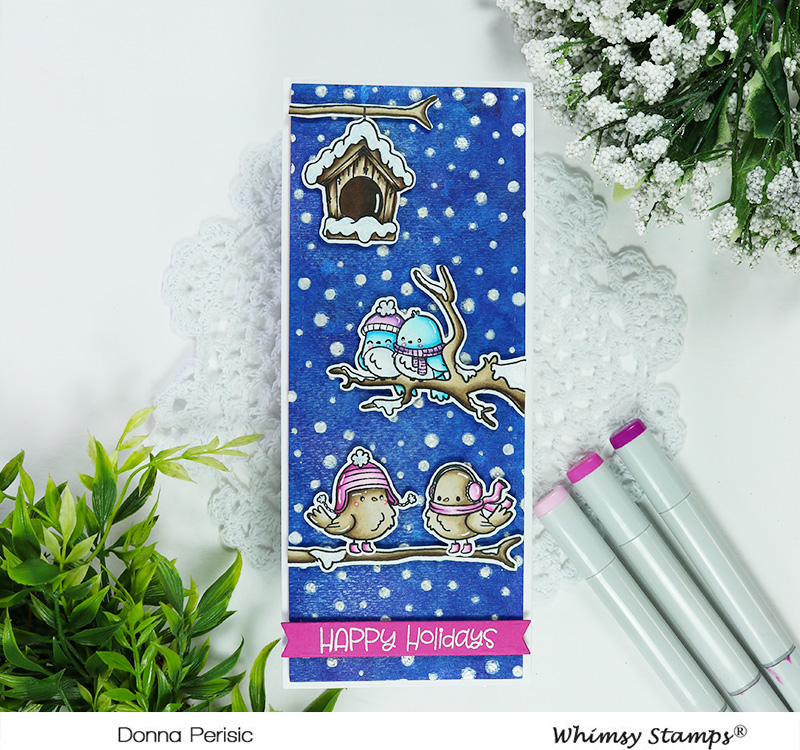
While the panel dries, I stamped the images from the Tweetie Pie Stamp onto a piece of solar white 80lb. cardstock with Memento Tuxedo Black ink and colored the images with Copic Markers.


Copic Marker Combination

Tree Branches / Bird House: E47, E44, E43, E42
Inside of Bird House: E49, E47
Blue Birds: B04, B02, B00, B0000, R22
Brown Birds: E44, E43, E42, E40
White: C3, C1, C0
Purple: V17, V15, V12, V01
Pink: RV66, RV55, RV52, RV00


Tweetie Birds


Once the coloring was complete, I used my ScanNCut to cut the images out, then set them aside to work on the background panel.

Using the Texturez in Tidy Widy, I created snow texture across the entire panel with the Polka Dot Stencil by Whimsy Stamps.

After the panel was completely dry, I arranged the images and adhered them to the background with foam adhesive. Finally, to complete this card, I stamped out the sentiment onto a piece of pink cardstock, embossed it, and trimmed it down using the double fishtail banner die from the Quick Strips Die Set.

Stop by my Instagram, linked below, to start the hop, then continue across all of the participants for more chances at winning a prize.


As always thank you so much for stopping by, until next time….sprinkle a little creativity on your day!

This card is entered in the following challenges

LeAnn’s World 101 |Die Cut Diva’s | Colour Crazy Craft Challenge | Penny’s Paper-Crafty Challenge | Stamping Sensations| Crafty Animals | Corrosive Challenge Blog | Let’s Craft and Create | Classic Design Challenge | Crafty Creations | Sweet Stampers Challenge | Love to Craft Challenge | Jan’s Digi Challenge |

Below you will find links to the supplies used to create this card. When possible, I use affiliate links to link products I use or personally believe in. To find out how affiliate links work and the companies I support, please check out my  Affiliate Disclosure/Shopping Sites. 


Collected Crafty Collabs November Hop | Whimsy Stamps Holly Jolly My Butt

Santa Clause


Hi crafty friends, it’s that wonderful time of the month where a group of crafty friends comes together to share projects made using crafty supplies we’ve squirreled away. Yes, it’s the Collected Crafty Collabs hop for November. And this month we are making Christmas inspired card with optional texture pastes or mousse.

For my card, I chose a grumpy Santa with an appropriate sentiment to reflect his mood. For some of us, as we get closer and closer to Christmas, we begin to feel like this guy.

I stamped the images onto Neenah Solar white 80lb. cardstock with Memento ink and used my Copic Markers to color in the images.


Santa Clause


Copic Marker Combination

Santa: R39, R29, R27, R24, R22
Skin: E13, E11, E00, E000
Beard: N3, N1, N0
White: N3, N1, N0
Black: N9, N7, N5, N3
Bag: E49, E47, E27, E25, E23, E21
Dog: E47, E44, E43, N7, N5, N3
Collar: R27, R25, 110
Tree: G28, YG17, YG03, YG01

I ink blended a panel of smooth cardstock with Distress Oxide ink in Blueprint Sketch, spritzed the panel with water, and added splatters. Once the panel was dry, I used the Twinkle Stencil and Therm O’ Web’s Glitz Glitter Gel to add a ton of sparkle to the background.


Santa Clause


I adhered the tree directly to the background, added foam adhesive to the focal point image, and die cut the sentiment from red and white cardstock then adhered it with foam adhesive to the card.

It may not be the jolliest Christmas card, but undoubtedly it will come in handy this year!

? Next up on the Collected Crafty Collabs hop is the lovely Danielle Brown

Hop along and be inspired by all of the wonderful and talented participants in this hop.

As always, thank you so much for stopping by, until next time….sprinkle a little creativity on your day!

Below you will find links to the supplies used to create this card.  I use affiliate links to link products I use or personally believe in. To find out how affiliate links work and the companies I support, please check out my  Affiliate Disclosure/Shopping Sites. 


Whimsy Stamps Happy Feet | Hello Winter Card

penguins

Good morning crafty friends! I have a new winter card to share with you featuring the newly released Happy Feet clear stamp set by Whimsy Stamps.

Here in Florida, the weather is still in the high 70’s but these adorable guys are enjoying much more cold weather in this winter scene card.

I started the card by creating the background first. Using Peacock Feathers, Broken China, and Tumbled Glass Distress Oxides, I ink blended a piece of Bristol smooth cardstock. Next, I spritzed the panel with water and blotted it dry, then I created splatters of diluted white acrylic paint and Peacock Feathers.


penguins


All of the images are stamped onto Neenah Solar White 80lb. cardstock then colored with Copic Markers.

Copic Marker Combination

Penguins: Black C9, C7, C5, C3
White: C3, C1, C0, R20
Beaks/Feet YR18, YR04, Y35
Teal: BG49, BG53, BG11
Red: R39, R29, R24


Once the coloring was complete, I used my ScanNCut to cut the images out. To complete the scene, I die cut several trees from the Forest Majesty Die Set, and a snowy hill from the Kinetic Straight Waves Die Set.

I adhered all of the elements to a side folding A2 sized card base, adhered the images with foam squares, and finished the card with a heat embossed sentiment.

As always thank you so much for stopping by, until next time….sprinkle a little creativity on your day!

Below you will find links to the supplies used to create this card. When possible, I use affiliate links to link products I use or personally believe in. To find out how affiliate links work and the companies I support, please check out my  Affiliate Disclosure/Shopping Sites. 


Whimsy Stamps Snowy Water Mill | Ink Blending Backgrounds

Snowy Water Mill

Good morning crafty friends, I have a very serene card to share with you today featuring the newly released Snowy Water Mill Rubber Cling Stamp by Whimsy Stamps.

This is a gorgeous rubber stamp designed by DoveArt Studios for Whimsy Stamps. I happen to be a huge fan of scenery stamps and all of the ones designed by DoveArt are just beyond stunning.

I began the card by ink blending a panel of Bristol smooth cardstock in Tumbled Glass, Shaded Lilac, and Spun Sugar Distress Oxide inks.

Once the panel was completely dry, I stamped the image using VersaMark ink and heat embossed it with black embossing powder.

Snowy Water Mill


Using a stitched rectangle die, I die cut the panel down to 3 ½” by 4 ¾”. I added foam tape to the back of the panel for dimension before adhering it onto a piece of black cardstock. I opted not to add a sentiment on the card but I can easily add the sentiment for any occasion.

A simple ink blended panel, embossing powder, and your card is all done. I hope you enjoy seeing something a little different as always thank you so much for stopping by until next time….sprinkle a little creativity on your day!

Below you will find links to the supplies used to create this card. When possible, I use affiliate links to link products I use or personally believe in. To find out how affiliate links work and the companies I support, please check out my  Affiliate Disclosure/Shopping Sites. 


Using Pattern Paper on Cards | Whimsy Stamps Magical Winter

snowman


Hey crafty friends! It is beginning to look like Christmas. Today’s card is a fun Christmas inspired card featuring pattern paper.

My most favorite color combination for Christmas cards is the teal and red combo. When I saw these pattern papers from the newly released Blurry Flurries Paper Pack, I knew that the paper would be perfect to create this easy card.

Looking through the collection, this teal pattern paper that fades into white caught my eye. It was a perfect background for this little snowman from the Magical Winter Clear Stamp.

The Snowman image was stamped with Memento Tuxedo Black ink onto a piece of Neenah Solar White 80lb. cardstock and colored with Copic Markers.


snowman


Copic Marker Combination

Snowman: C3, C1, C00, BV20, B000
Red: R39, R27, R24, R22
Carrot: YR18, YR15, Y38
Skies/Arms: E39, E37


I die-cut a frame from red cardstock, and finished the card by white heat embossing the sentiment onto red cardstock.

Undoubtedly, this is an easy card to create because the pattern paper creates the background. Adding a frame element and an image completes this card in a flash.

I hope you enjoyed this card, as always thank you so much for stopping by, until next time….sprinkle a little creativity on your day!

Below you will find links to the supplies used to create this card. When possible, I use affiliate links to link products I use or personally believe in. To find out how affiliate links work and the companies I support, please check out my  Affiliate Disclosure/Shopping Sites. 


Quick and Easy Holiday Card | Whimsy Stamps Gossip Holiday Girls + Gilded Holiday Paper


Hey crafty friends, today I’m sharing a quick and easy Holiday inspired card using pattern paper for the background. This card features Gilded Holiday Paper Pack paired with Gossip Holiday Girls Clear Stamp by Whimsy Stamps.

There is something so elegant when combining gold and black. It’s a luxury combination because these colors are such a contrast, they are absolutely eye-catching.


I chose a piece of pattern paper and die cut the panel using a stitched rectangle die. Next, I created a thin gold frame by die cutting gold cardstock using a rectangle frame die.

I stamped the image with Memento Tuxedo ink onto a piece of Neenah Solar White 80lb cardstock and used my Copic Markers to color it in.

Copic Markers Combination

Skin E13, E11, E00, E000, R20, R27
Hair: E29, E27, E25, E23, E21
Gold: Y26, Y15, Y13, Y11
White: C3, C1, C00
Antlers: E49, E29, E25

For the sentiment, I die cut a piece of cardstock then gold embossed the piece several times before adding the sentiment and heat setting black embossing powder.


To finish this card, I adhered the pattern paper to an A2 sized card base and popped all of the elements using foam adhesive.

I hope you found some inspiration in this quick and easy card and as always, thanks for stopping by, until next time….sprinkle a little creativity on your day!

Below you will find links to the supplies used to create this card. When possible, I use affiliate links to link products I use or personally believe in. To find out how affiliate links work and the companies I support, please check out my  Affiliate Disclosure/Shopping Sites. 


Whimsy Stamps Candy Corn Dress Up | 31 Nights of Halloween

Whimsy Stamps Candy Corn Dress Up

Hi crafty friends! Are you enjoying the month-long inspiration of Halloween and prizes? It’s Donna from the Whimsy Stamps Video Team, and I am sharing a cutesy Halloween card featuring the Candy Corn Dress Up stamp set.

I started by stamping out all of the images onto solar white cardstock with Copic friendly ink and colored them in with Copic Markers. Then I used my ScanNCut to cut the images out.

Copic Markers: E35, YR07, YR04, YR12, E34, Y15, Y08, Y00, B17, B13, B04, B02, YG17, YG03, N7, N5, N3, N1, N0, C3, C1, C00

Whimsy Stamps Candy Corn Dress Up

For the background, I trimmed a piece of smooth cardstock down to 8.50” by 3.50” and ink blended the background using Distress Ink in Seedless Preserve, Picked Raspberry, and Dried Marigold.

I blended a small panel of smooth cardstock with Distress inks in Twisted Citron and Mowed Lawn for the grass. I die cut the panel with the grass die from the Grass and Cloud Edger Dies.

Next, I added water splatters and white diluted paint across both of the panels and set those aside to dry.

While the panels were drying, I die cut several trees from the Forest Majesty Die Set and added Walnut Stain and Vintage Photo to ink them.

Whimsy Stamps Candy Corn Dress Up

At this point, I had all of the elements, and it was time to start assembling the card. I added the background panel using liquid adhesive to a slimline card base. I used foam tape to add dimension to the grass border and added in all of the images.

To complete this card, I trimmed a piece of black cardstock, stamped the sentiment from the stamp set, popped it up on foam adhesive on the card front, and finally, added the clouds from the Happy Sky stamp set.

I hope you are enjoying the 31 Nights of Halloween and are inspired by all of the projects so far, don’t forget to enter the grand prize giveaway on the Whimsy Stamps Blog!


Below you will find links to the supplies used to create this card. When possible, I use affiliate links to link products I use or personally believe in. To find out how affiliate links work and the companies I support, please check out my  Affiliate Disclosure/Shopping Sites. 


Slimline Christmas Handmade Card | Whimsy Stamps Slimline Vertical Sentiment + Fancy Frame Die

Whimsy Stamps Slimline Christmas Card

Hey crafty friends! I am on the Whimsy Stamps channel with a new Christmas card featuring the newly released Slimline Vertical
Sentiments Clear Stamps, Slimline Fancy Frame Die, and a previously released Candy Cane Lane Stamp set.

To start my card, I began by ink blending a piece of Bristol Smooth Cardstock using Distress Oxide inks in Tumbled Glass, Salty Ocean, Blueprint Sketch, and a little bit of Black Soot around the edges.

I stamped the image out on a piece of Neenah Solar White 80lb. cardstock using Memento Tuxedo Ink and used my Copic Markers to coloring and create the scene.

Whimsy Stamps Slimline Christmas Card

Copic Marker Combination

Santa / Mrs. Claus R59, R39, R27, R24
Skin: E11, E21, E00, E000, R22
Gingerbread House: E47, E44, E43, E42
Gingerbread Man: E43, E42
Red: R59, R27, R24
Blue: B05, B01, B000
Green: G28, YG17, YG06, YG01
White: C3, C01, C00

Once the coloring was complete, I used my ScanNCut Machine to cut the images out. For the sentiment, I stamped out Christmas from the Slimline Vertical Sentiments Clear Stamp onto a piece of red cardstock then added white embossing powder.

Finally, I added the ink blended panel to an 8.50 x 3.50 slimline card base, trimmed the sentiments, and popped up all of the images onto my card front.


There is a video tutorial for this card and you can view it below a


Thank you so much for stopping by, until next time….sprinkle a little creativity on your day!

Below you will find links to the supplies used to create this card. When possible, I use affiliate links to link products I use or personally believe in. To find out how affiliate links work and the companies I support, please check out my  Affiliate Disclosure/Shopping Sites. 


Whimsy Stamps Dragon Christmas Cheer | Copic Coloring One-layer Scene Card

Whimsy Stamps Dragon Christmas Cheer

Hey crafty friends! The Whimsy Stamps release is live now! I am excited to share with you a one-layer card featuring the newly released Dragon Christmas Cheer clear stamp set.

One of my favorite techniques is to create a one-layer scene card, either by stamping or hand-drawing some of the elements on a card.

I created a funny winter scene with the sweet but clumsy dragon all tangled up in Christmas lights.


Whimsy Stamps Dragon Christmas Cheer


I began by stamping out the image using Memento Tuxedo Black ink onto a piece of Neenah Solar White 80lb. cardstock. Using a pencil, I lightly drew out the door, window, step, and snowbank.

Before beginning to color using Copic markers, I did erase the pencil marks because once the alcohol marker is added, the pencil line will not erase.

Copic Marker Combination

House: R29, R27, R24, R22, R20
Door: C7, C5, C3, C1
Door Frame: C3, C1, C00
Doorknob: Y28, Y26
Window Frame: C3, C1, C00
Light in the house: Y32, Y21, Y11
Step: C5, C3, C1
Dragon: BG49, BG45, BG53, BG10, W9, W7, W5, W3
Christmas Lights: Y35, Y11
Snow Bank: C1, BV20, B000, Glitter Pen
White Gel Pen for Snow.


Whimsy Stamps Dragon Christmas Cheer


Once the coloring was complete, I trimmed the panel down to an A2 sized card-front, heat embossed the sentiment onto a piece of black cardstock and popped the sentiment onto the card.

I hope you enjoy seeing something a little different as always thank you so much for stopping by until next time….sprinkle a little creativity on your day!

Below you will find links to the supplies used to create this card. When possible, I use affiliate links to link products I use or personally believe in. To find out how affiliate links work and the companies I support, please check out my  Affiliate Disclosure/Shopping Sites. 


Quick and Easy Christmas Card | Loads of Cheer and Cosmic Swirl BG Stamp

Whimsy Stamps Loads of Cheer


Hey crafty friends! I have a new video on the Whimsy Stamps Channel featuring the newly released Loads of Cheer and Cosmic Swirl Background.

CARD DETAILS

To create the card, I began by stamping the background onto a piece of Neenah Solar White 110lb. cardstock using a VersaFine Clair in Warm Breeze.

I added clear embossing powder to the background and heat set the image. Next, I used a rectangle die by Hero Arts to cut the panel.

I colored the image with Copic Markers and used the ScanNCut to cut the image out.

Copic Marker Combination

Skin: E04, E13, E11, E00, E000
Beard: C3, C1, C00
Red Coat/Pants/Hat: R39, R29, R24, R22, C3, C1, C00
Boots: N9, N5, N3
Chimney: E37, E99, E97, E35, E33, E31
Snow Bank: C3, C1, C00

Whimsy Stamps Loads of Cheer

At this point, all of the elements to my card were complete and I can begin adhering them down to an A2 sized card front.

For a little pop of color, I added a piece of red cardstock trimmed slightly larger than the most top panel then added the image and the sentiment.

Be sure to check out the video on the Whimsy Stamps Chanel and see how I created this easy Christmas card.


As always thank you so much for stopping by, until next time….sprinkle a little creativity on your day!

This card is entered in the following challenges

Lemon Shortbread Challenge | A Gem of a Challenge | All Fun Challenges | Crafts Galore Encore |


Below you will find links to the supplies used to create this card. When possible, I use affiliate links to link to products I use or personally believe in. This means that if you make a purchase through the links I share, I will earn a small commission at no additional cost to you! This helps me to run this blog and my YouTube channel to share the cards I make. Thank you so much for your support!